What Is An Agent?
The term “agent” has been increasingly used in recent times to describe various technologies, including OpenAI DeepResearch, Operator, and Grok 3. According to Wikipedia’s definition of “intelligent agent”:
In artificial intelligence, an intelligent agent is an entity that perceives its environment, takes actions autonomously to achieve goals, and may improve its performance through machine learning or by acquiring knowledge.
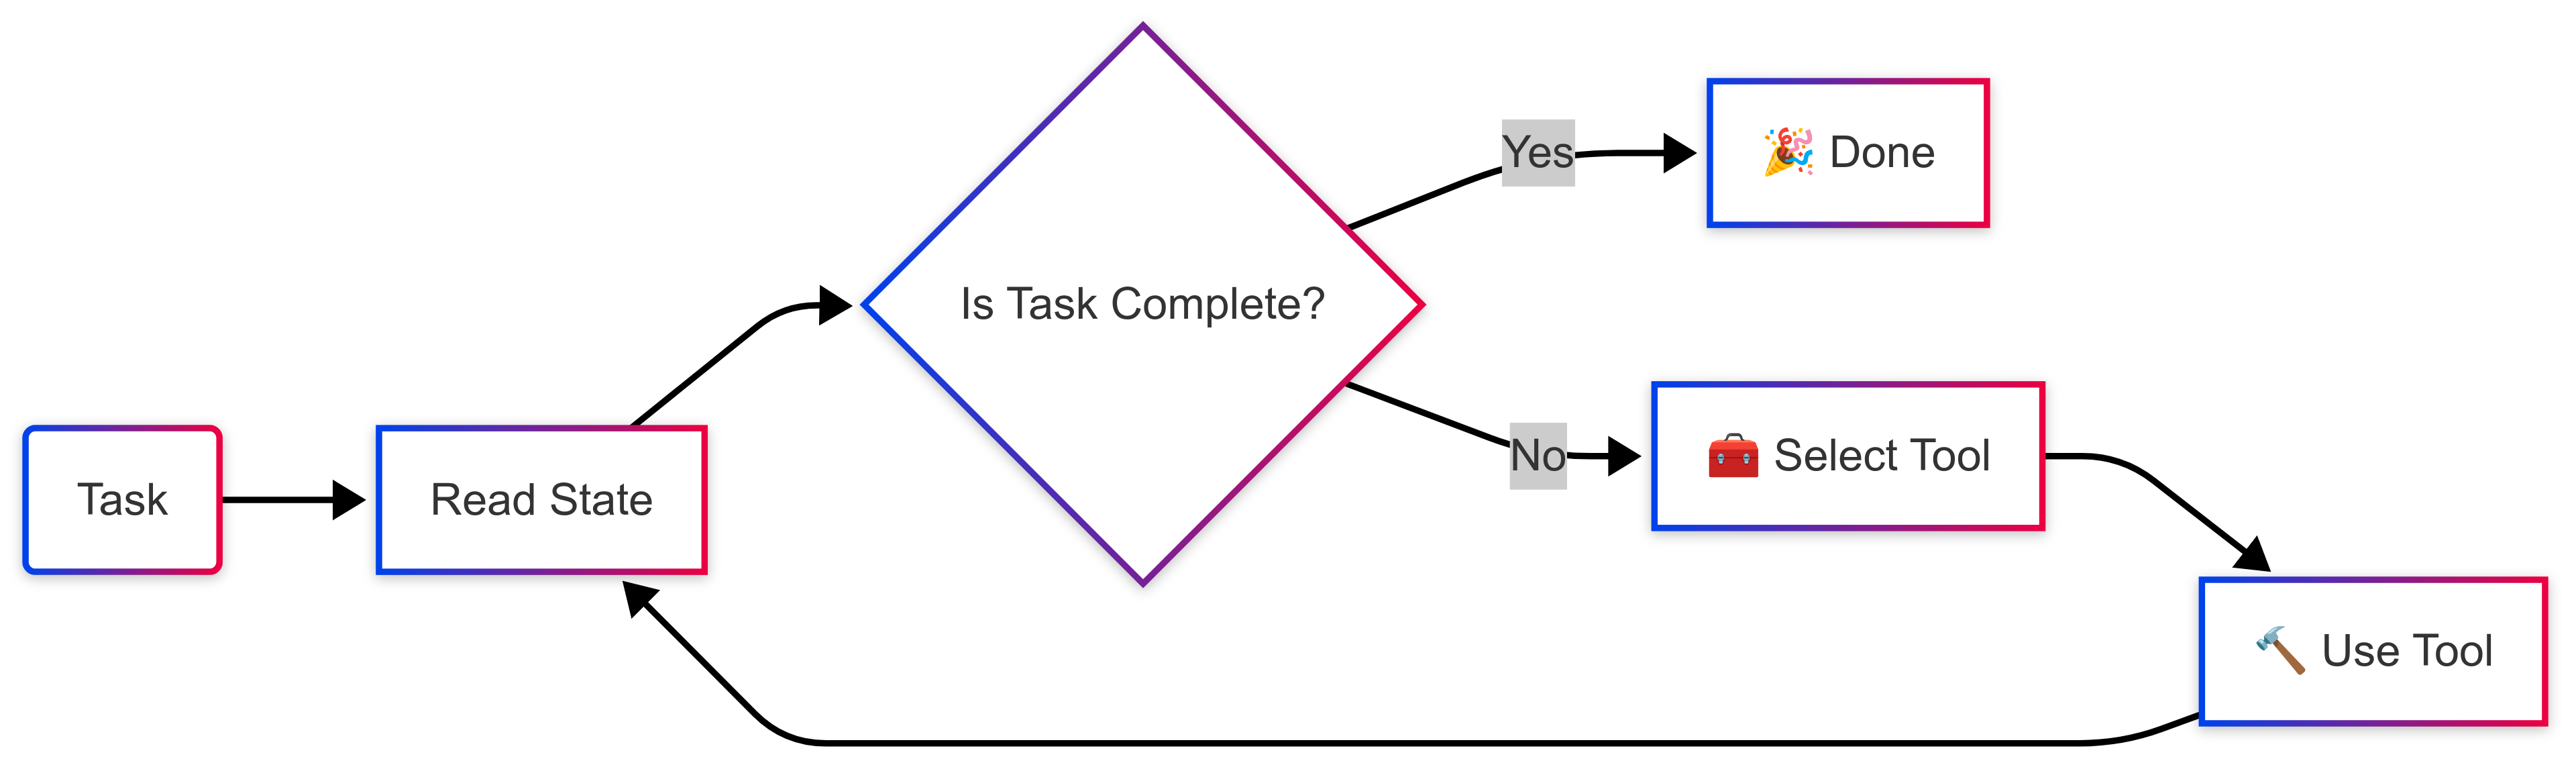
In similar terms, we can think of an agent as a model (being it an LLM or other older algorithms) that, after making an observation, decides which tool to use from its “toolbox” to complete the given task, step by step, in a loop. This reframing, in my opinion, better aligns with the chat or sequential-based experience we have nowadays with large language models and gives us a clue for how an agent might look like in software.
Aren’t we all living in our own loop, trying to make the best of what we have, one day at a time? Anyways …
What Is A Tool?
In the context of LLMs and LLDMs, models can be made aware of and use these tools through a mechanism called, unsurprisingly, function calling. Most of the models you ever interacted with have been trained to understand a “here’s tool A that does X” message (the tool definition) in their prompts.

For instance, here’s how llama3.3 understands its toolbox as part of its system prompt:
1 | When you receive a tool call response, use the output to format an answer to the orginal user question. |
Each tool definition is a JSON document that looks something like this:
1 | { |
The model receives all of these tool definitions as part its system prompt. When it is later asked in a chat, “What’s the weather in San Francisco?”, it can use one or more of these tools by responding with an _”I want to use tool A with these parameters: …” response message that looks like this:
1 | { |
But how do we go from JSON to providing tools with actual functionality to the model? And how do we execute these tool calls? How do we return their output back to the model?
This part of the job - that “chat -> execute tools -> observe state -> loop or break if task done” loop from the earlier diagram - is delegated to whatever agentic framework you are going to use (and a lot of your good will).
There are several of these frameworks, each taking a different approach. Some provide a minimal API to control predefined agent types, while others use similar concepts with different abstractions. Some can feel overly intricate, making it challenging to navigate their design choices. They all come with certain limitations and, most importantly, require you to write code, learn their abstractions, and adapt your agent ideas to fit their structure.
In my personal view, many of them are more complex than necessary. If agent = a model executing tools in a loop, we can have something better - something that abstracts away the agent’s inner mechanics and lets us focus on the actual agent logic.
Why Nerve?
Nerve was written (and rewritten, now twice 😬) as an ADK (Agent Development Kit) with the KISS principle in mind: anything that can be generalized as part of the framework should not be something the user has to handle unless they choose to. So they can focus on the actual agent logic rather than the agent loop and other abstractions.

This is what a Nerve agent looks like:
1 | agent: You are an helpful assistant using pragmatism and shell commands to perform tasks. |
And this is how you run it in a terminal: nerve run agent.yml.
Nerve includes a built-in library of agent oriented tools, organized in namespaces, that can be included via the using directive (in this example, the shell namespace allows the agent to execute shell commands). You can think about this as a “standard library“ for agents including functionalities that can be reused.
At the time of writing, the existing namespaces are (check the documentation for the list of tools in each one; in bold are my personal favorites :D):
- 💻 shell - Let the agent execute shell commands.
- 📂 filesystem - Read-only access primitives to the local filesystem.
- 🔧 anytool - Let the agent create its own tools in Python.
- 💻 computer - Computer use primitives for mouse, keyboard, and screen.
- 🌐 browser - Browser use primitives. (very experimental but promising)
- 💬 inquire - Let the agent interactively ask questions to the user in a structured way.
- 🧠 reasoning - Simulates the reasoning process at runtime for models that have not been trained for it.
- ✅ task - Let the agent autonomously set the task as complete or failed.
- 🕒 time - Tools for getting the current date and time and waiting for a given number of seconds.
What Can I Do With It?
Nerve is generic enough to be used for a variety of tasks. Before we start creating our first agent, I want to spend a few words about some of the existing examples that interest me the most and/or that I use on a daily basis and why. In the majority of the cases you’ll see that the YAML implementation is rather simple despite what these agents can do :)
code-audit
This agent existed in Nerve’s examples folder since its first iteration and I have been using it one way or another for all sorts of things. The agent is given read-only access to a folder and the task to:
- review the source code in it
- append any potential vulnerability to an audit.jsonl report file
- keep going until all files are processed
1 | nerve run code-audit --target-path /path/to/src |
Nerve ( https://t.co/wNopPIX7fu ) and the code_auditor example tasklet ( https://t.co/KjwSi6q2BE ) using GPT-4o to find a RCE vulnerability in the widget-options v4.0.7 Wordpress Plugin 🧠
— Simone Margaritelli (@evilsocket) December 2, 2024
Zero code, fully autonomous agent as a simple YAML file. pic.twitter.com/SkaI7ijGPx
changelog
This little utility is a lifesaver for generating an high-level, nicely formatted changelog like this one from a list of commits like these ones.
1 | # -q is the quiet mode, logs are disabled and only the changelog markdown (and fatal errors) will be printed to stdout |
webcam
There are four pets in my apartment and several security cameras: I’ve always wanted a “bot” that could check the video feed, detect custom events I can describe with languange such as: “the doggo being cute” or “the kitten breaking something” (or “my son is taking their first steps” for another use-case :D) and alert me via Telegram or whatever. When good open source vision models started being a thing, I could not not write this one :D
1 | # set the webcam rtsp url |
i always wanted a system that could check my ipcams and inform me when my pets are being cute ... pic.twitter.com/qvd52SrUdq
— Simone Margaritelli (@evilsocket) February 6, 2025
computer-use
An experimental agent that can be used with vision models to use your computer to perform tasks:
1 | nerve run computer-use --task 'open the browser and check the news on cnn.com' |
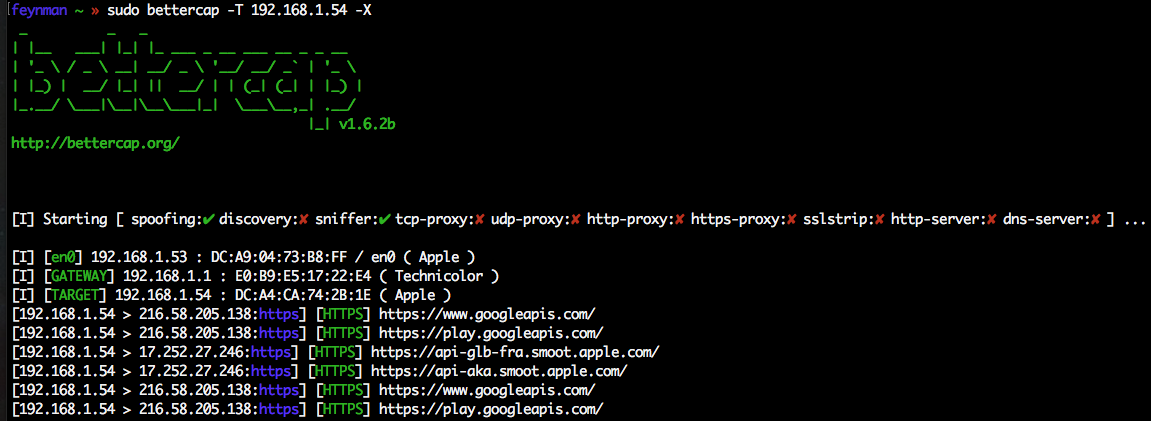
bettercap-agent
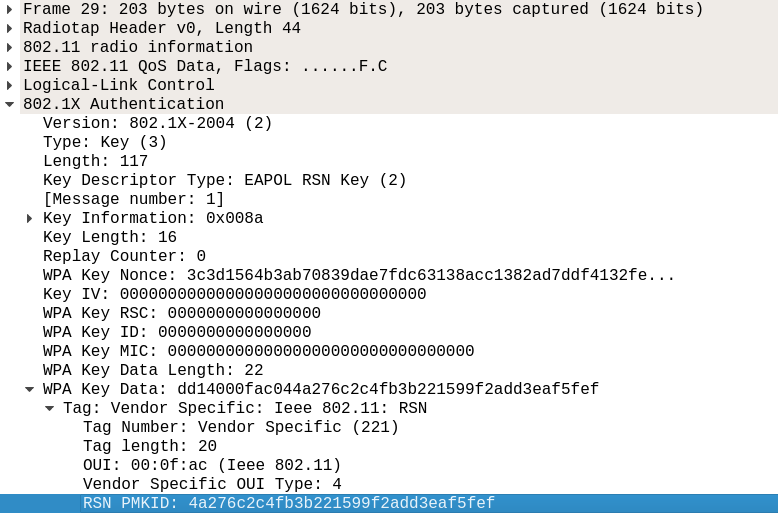
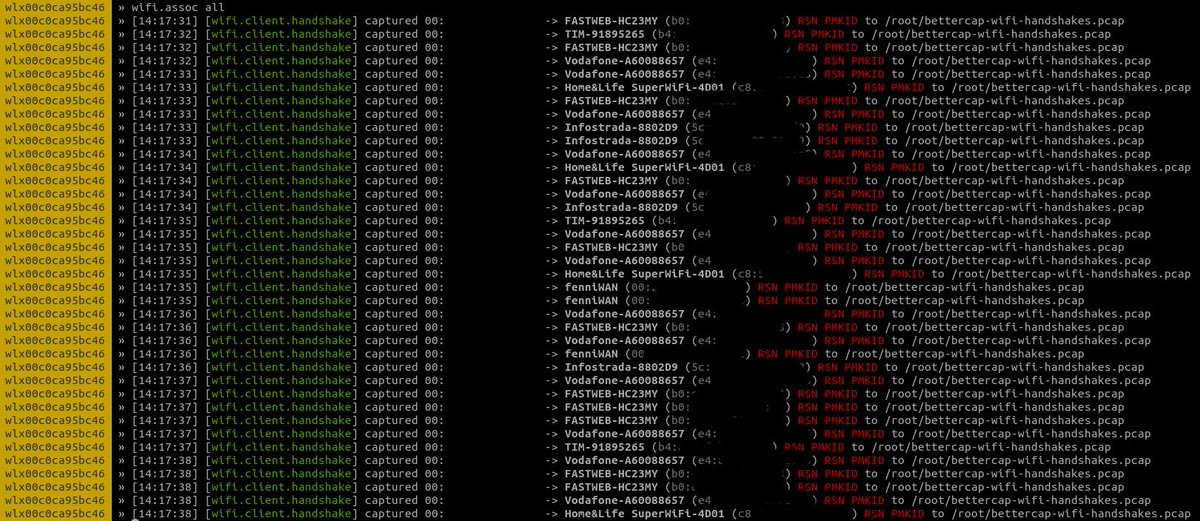
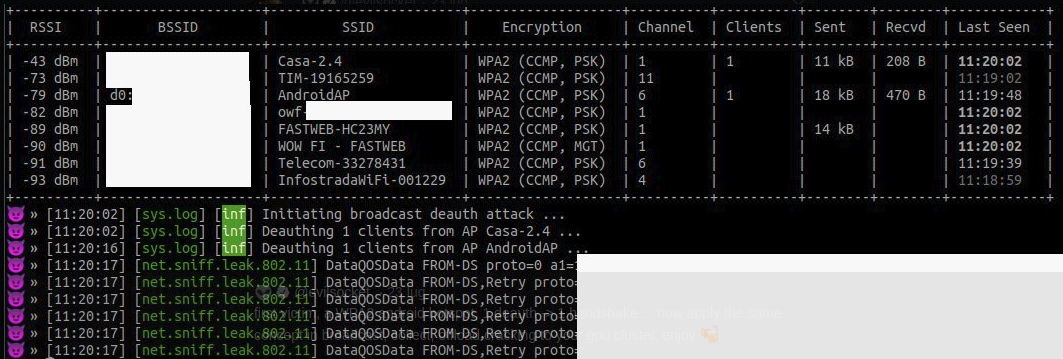
This is an example of how the API of a service can be used as a tool. The agent can interact with a running bettercap instance via its REST API and perform tasks like ‘find the most vulnerable WiFi access point’ or:
1 | nerve run bettercap-agent --task 'deauth all the apple devices' |
nerve run bettercap-agent --task 'find the oldest wifi access point'
— Simone Margaritelli (@evilsocket) March 11, 2025
What gets me every time is how the model uses the help menu to determine the best commands to execute ... AI can RTFM ❤️ pic.twitter.com/b2YbFyzuyK
android-agent
Very experimental but promising Android automation agent. An ADB shell is all an agent needs:
1 | nerve run android-agent --task 'take a selfie and send it to jessica' |
"open YouTube and search for ‘cats’” 🧠 pic.twitter.com/PfApM2zKqk
— Simone Margaritelli (@evilsocket) March 5, 2025
ab-problem
The agent is given a logic puzzle and its answer is evaluated at runtime. This example shows how a tool can alter the runtime state and set the task as complete or let the agent loop continue. This is a foundational feature for agent evaluations.
1 | nerve run ab-problem --program 'A# A# #A #A B# #B #B #A' |
recipe-workflow
Used to showcase the concept of workflows. Pick any food and use multiple agents to write a tasty and nicely formatted recipe for you:
1 | nerve run recipe-workflow --food 'spaghetti alla carbonara (con guanciale, non pancetta!)' |
Creating an Agent
Let’s start with the fun stuff! First, to install and use Nerve, you’ll need Python 3.10 or newer.
Use PIP to install (or upgrade) Nerve:
1 | pip install --upgrade nerve-adk |
Then, if you don’t feel like creating the agent YAML file from scratch, you can use the guided procedure for agent creation.
Start creating an agent by executing the command nerve create weather.yml and when prompted, use these values:
- Path: leave default
- System prompt: leave the default for now (however, it is important to define the “persona” of your agent as accurately as possible. For examples of simple system prompts you can reuse, check the agents in the examples folder).
- Task:
What's the weather in {{ place }}?(the{{ place }}jinja2 syntax allows us to create parametric agents) - Tools: select
taskandtime; deselect (for now)shell.
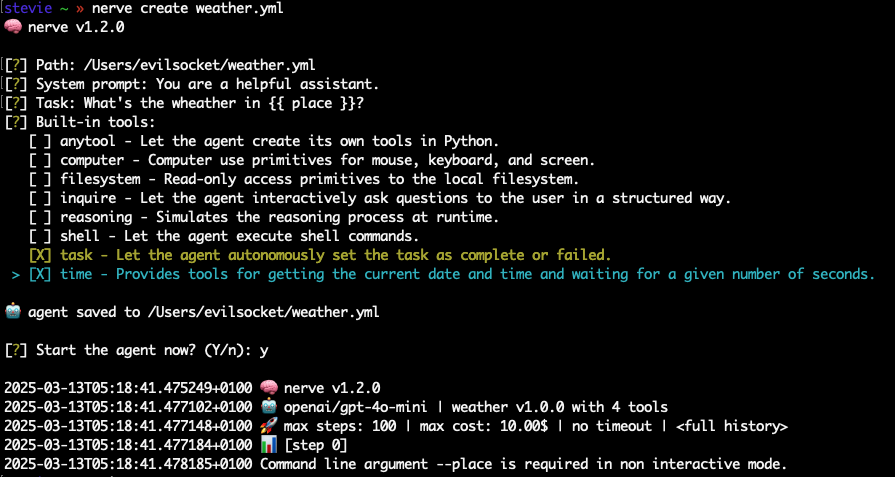
At the end of the procedure, the weather.yml file that Nerve generated will look like this (except for the comments and formatting I added here for clarity):
1 | agent: You are an helpful assistant. |
Since we are referencing the place variable in the prompt, we’ll need to provide it as a command line argument, otherwise the agent will exit with the message:
Command line argument –place is required in non interactive mode.
Moreover, our agent doesn’t have weather forecast related tools (yet), therefore if we run it with nerve run weather.yml --place rome we’ll likely see it “giving up” like this:

Adding Tools
Via YAML
We could easily extend the agent tooling by adding a tools section, with a get_current_weather tool that will use curl to read wttr.in and return the forecast information to the model:
1 | # we added the second part to let the agent use the task namespace effectively |
If we run this agent again with nerve run weather.yml --place rome, now the agent will execute and use the output of the new tool:

Via (LLM’s) Common Sense
This, however, is unnecessary. These models are smart enough to figure the right tool to use on their own, so most of the times we can just do this:
1 | agent: You are an helpful assistant, use the shell to get the weather, report it in a nice format and then set your task as complete. |
This version of the agent simply relies on the shell standard namespace. The model will use it to execute the CURL command curl -s 'http://wttr.in/Rome?format=3':
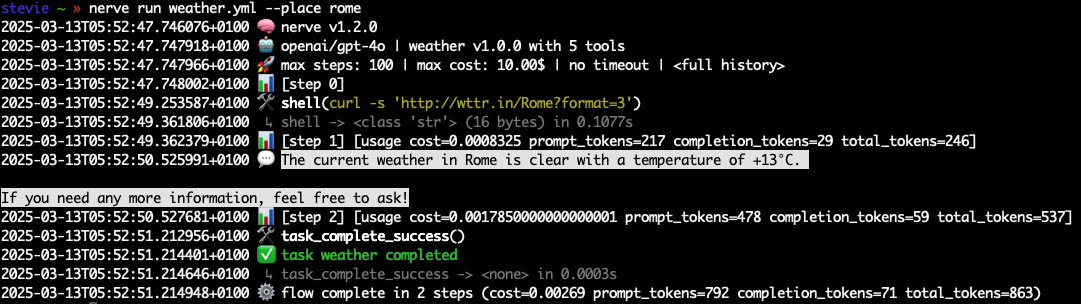
This demonstrates how, when provided with simple tools to complete a task, a model will naturally determine how to use them effectively. The emergent behavioral complexity these models exhibit when equipped with a robust tooling framework and a state machine to operate within suggests that we are only scratching the surface of what’s possible with existing models.
In Python
Tools that require more complex logic can be implemented in Python. Creating a tools.py file in the same folder of the agent will automatically provide the functions as tools:
1 | import typing as t |
A perfect example of this feature is the ab-problem agent that relies on Python tools to evaluate the model response to a logic puzzle that’s dynamically generated, and complete the task when the evaluation is successful.
However keep in mind that I managed to have an agent use my Android phone just with the shell and adb shell. So, when in doubt, KISS! :D
As an SDK / ADK
Ultimately, if you really want to write code, Nerve can be used as a Python package to fully customize your agent loop, down to the single step.
1 | import asyncio |
Check the examples/adk folder for more examples.
Supported Models
Nerve uses LiteLLM, therefore any inference provider in this list is supported and different models can be used either via the -g / --generator command line argument, or by setting the NERVE_GENERATOR environment variable.
For instance, to run the weather agent via a local ollama inference server for free:
1 | nerve run -g 'ollama/qwq' weather.yml --place rome |
To use another server:
1 | nerve run -g 'ollama/qwq?api_base=http://your-ollama-server:11434' weather.yml --place rome |
Other Features
Agents can be made of a single YAML file like in the weather.yml example, or of a folder with an agent.yml inside, so that foobar/agent.yml is detected as an agent called foobar. If you want to access an agent from anywhere in the terminal, you can copy it in the ~/.nerve/agents folder:
1 | # create the folder if it doesn't exist |
Now you can use it with nerve run weather from anywhere. My favorite agents so far to have in this load path are this changelog generator, and code-audit that I run regularly on my code changes.
Sessions can be recorded with --trace:
1 | nerve run weather.yml --place rome --trace trace.jsonl |
And replayed with:
1 | # -f for fast forward |
As usual, for more features and information, read the f…antastic manual :D
Getting to 1.0.0
Nerve 1.x.x is a distillation of lessons learned. The first iteration that I wrote during summer 2024 was an explorative, soon-to-be-reimplemented Python PoC. Back then, I thought that reimplementing it in Rust would have been a good idea, so I wrote what now lives on the legacy-rust branch.
Boy, was I wrong.
There’s no single Rust crate for talking to any LLM via a unified interface … and the ones that exist for specific providers don’t support most of the functionalities needed for an agent. Python is simply the language of AI, so by leaving it behind I also left behind all those convenient libraries like LiteLLM and LangChain and I had to reimplement a lot of stuff (and more stuff = more technical debt). Plus a dozen other relatively minor issues. Most importantly after a few months of writing agents and Rust refactorings, I consolidated a set of cleaner, simpler abstractions that allowed me to reimplement everything (again) in Python in a more elegant solution.
This new version can talk to any LLM of any provider, offers a very powerful templating engine (jinja2) for the prompts, can be extended with endless libraries and it makes defining, chaining and running complex agents very simple.
Embrace change.
Future
I’ll be allocating most of my time on this project. It’s a lot of fun and I believe it has great potential.
Interactive Mode: a debugger-like mode that allows you to pause the agent execution, inspect the state, change things around, ask questions, give feedback, new directives and then continue.
Workflows 2.0: a rewrite of the workflows system with an event bus (both for IPC and network)
that agents can advertise their presence on, and talk to each other with. Each agent is its own process attached to this shared bus.
Browser-use: so hard to get right for real, work in progress …
Project-MU: an open source evaluation framework built with Nerve.
More Tools: the standard library will probably be growing with more capabilities.
More Examples: the more the better! Some of the agents will probably be moved to their own repository as mini projects.
More Integrations: bettercap is just the beginning.
BTW I’m looking for a (remote) job, so if you have any openings for a good software engineer with hands-on experience with AI/ML and cybersecurity, feel free to check my resume, ping me on LinkedIN or drop me a line at evilsocket AT gmail DOT com ♥ 🙏


 Credits: i have no idea how this works


 Credits to Ange Albertini
 Credits to the "Machines Can Think" blog
 Credits to the "Machines Can Think" blog
 Credits to nature.com


 The model detecting a sample as malicious with over 99% confidence.


 A client side encrypted record set to expire and self delete with a markdown area and a password widget.
 Markdown and various attached files.


